Multi-tasking apps on ARDUINO
published: 14 May 2019 / updated 18 June 2020

Preamble
Here's a video, showing the operation of several simultaneous tasks, on an Arduino Nano using Flash Forth.
loading of task.txt and pinsDefinitions.txt files
For the examples described below to work, you must load in the ARDUINO card the contents of the files:
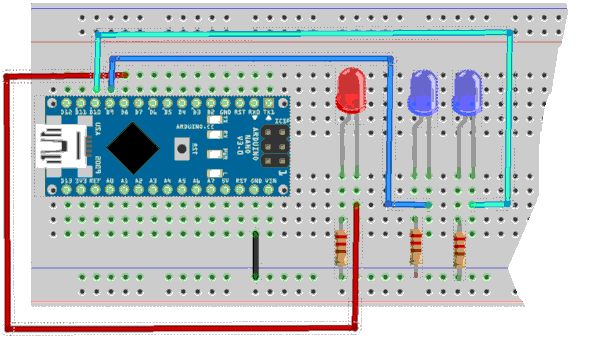
LED mounting circuit on Arduino NANO:
LEDs management code:
\ require task.txt
\ require pinsDefinition.txt

-testLED
marker -testLED

\ tests
\ PORTB
37 constant PORTB               \ Port B Data Register
PORTB %00000001 defPIN: RED     \ red led on PB0
PORTB %00000010 defPIN: BLUE1   \ blue 1 led on PB1
PORTB %00000100 defPIN: BLUE2   \ blue 2 led on PB2
\ : init.ports ( ---)
\    RED output
\    BLUE1 output
\    BLUE2 output
\  ;

: blink.RED ( ---)
    RED output          \ init portB
    begin
        RED high
        200 ms
        RED low
        200 ms
    again
  ;

: wigwag.BLUE ( ---)
    BLUE1 output        \ init portB
    BLUE2 output
    begin
        BLUE1 high  BLUE2 low
        350 ms
        BLUE1 low   BLUE2 high
        350 ms
    again
  ;

0 20 20 0 task: task2
0 20 20 0 task: task3

: t2 ( ---)
    ['] blink.RED    task2 tinit task2 run  ;
: t3 ( ---)
    ['] wigwag.BLUE  task3 tinit task3 run  ;

\ t2            start tast2
\ t3            start task3
\ tasks         display all active tasks
\ task2 end     shut down task2
\ task3 end     shut down task3
Do not run the word blink.RED or wigwag.BLUE from
the terminal. Each of these definitions contains a begin..again loop
which can only be interrupted by restarting the Arduino board.
If you want to test the LEDs, do it via the interpreter. LED test red:
RED output          \ init portB
RED high
RED low
Testing blue LEDs:
BLUE1 output        \ init portB
BLUE2 output
BLUE1 high
BLUE2 low
BLUE1 low
BLUE2 high
BLUE2 low
Once the LEDs have been tested, we can define the tasks:
0 20 20 0 task: task2
0 20 20 0 task: task3
We defined two tasks task2 and task3. The
first task already exists, it is called operator.
We now prepare the definitions responsible for activating these tasks:
: t2 ( ---)
    ['] blink.RED    task2 tinit task2 run  ;
: t3 ( ---)
    ['] wigwag.BLUE  task3 tinit task3 run  ;
Multitask activation
From the terminal, the word tasks indicates the current tasks:
tasks \ display operator
Activate task t2 by typing t2:
t2
tasks \ display operator task2
We now activate the t3 task by typing t3:
t3
tasks \ display operator task3 task2
As seen at the beginning of the video, the led L1 flashes, the leds L2 and L3 flash alternately (wigwag mode). And we continue to have our hands on the terminal!
To interrupt the execution of a task, type this:
task3 end
tasks \ display operator task2
In this example, the programmer has started two other tasks in addition to the operator task.
The number of simultaneous tasks is not limited.
But the FORTH language task mechanism is a so-called round-robin system, similar to a token system. The transition from one task to another is managed by multitasking. But if a task crashes, all the tasks are interrupted.
The power of the FORTH language makes it possible to test each software component independently of the others, which greatly facilitates the development of programs. In FORTH, a function nested in another function (in FORTH, word=function) remains accessible